
| 일 | 월 | 화 | 수 | 목 | 금 | 토 |
|---|---|---|---|---|---|---|
| 1 | 2 | 3 | 4 | 5 | 6 | 7 |
| 8 | 9 | 10 | 11 | 12 | 13 | 14 |
| 15 | 16 | 17 | 18 | 19 | 20 | 21 |
| 22 | 23 | 24 | 25 | 26 | 27 | 28 |
| 29 | 30 |
- jstl dependency
- jenkins git ignore file 추가
- aws lightsail
- XSS 예방
- fk컬럼 삭제
- git
- 제약조건 제거
- lightsail 도메인 연결
- docker error
- aws
- spring
- springboot 배포
- 지속쿠키
- springboot3 jstl
- rsa 복호화
- 내도메인 한국
- Stored Procedure log
- jstl 종류
- Docker
- Flutter
- 세션쿠키
- 하이브리드 암호화
- rsa java
- 하이브리드암호화
- 스왑 메모리
- 플러터
- aws lightsail 배포
- swap file
- AES
- RSA
- Today
- Total
easycode
[Spring] 네이버 클라우드 SMS API 사용하여 6자리 난수 인증코드 보내기(feat. 휴대폰 인증까지) 본문
**혹시 다크모드를 사용 중이시라면 잠시만 꺼 주세요. 현재 다크모드 스킨 테스트 중으로 글 중간중간이 안보일 수도 있습니다**
현재 진행중인 프로젝트(우연)에서 원래는 사용했으나... 로직 변경으로 인하여 메시지 전송 로직은 빼게 되었다.
그러나 공부하고 테스트하며 적용했던 게 아까워 글로라도 남겨 봅니다. 혹시나 네이버 클라우드의 SMS API를 사용하게 되는 분이 보고 도움이 되기를 바랍니다.
개발 환경 : Spring boot 2.7.x. 버전(Gradle), JDK 11, JPA(을 사용했지만 Mybatis와 같은 SQL Mapper도 상관 없습니다)

네이버 클라우드 SMS API 서비스 신청하기
1. 네이버 클라우드 플랫폼 가입
먼저 네이버 클라우드 플랫폼에 가입해야 한다! 네이버 클라우드 플랫폼을 검색해서 들어가도 좋고, 아래 주소를 클릭해도 된다.
NAVER CLOUD PLATFORM
cloud computing services for corporations, IaaS, PaaS, SaaS, with Global region and Security Technology Certification
www.ncloud.com
네이버 아이디가 있다면 연동해주면 된다.
가입을 완료했다면 '콘솔'로 이동해준다.
2. 네이버 클라우드 플랫폼 콘솔 - service - Application Service - Simple & Easy Notification Service 로 이동

3. 프로젝트 생성하기
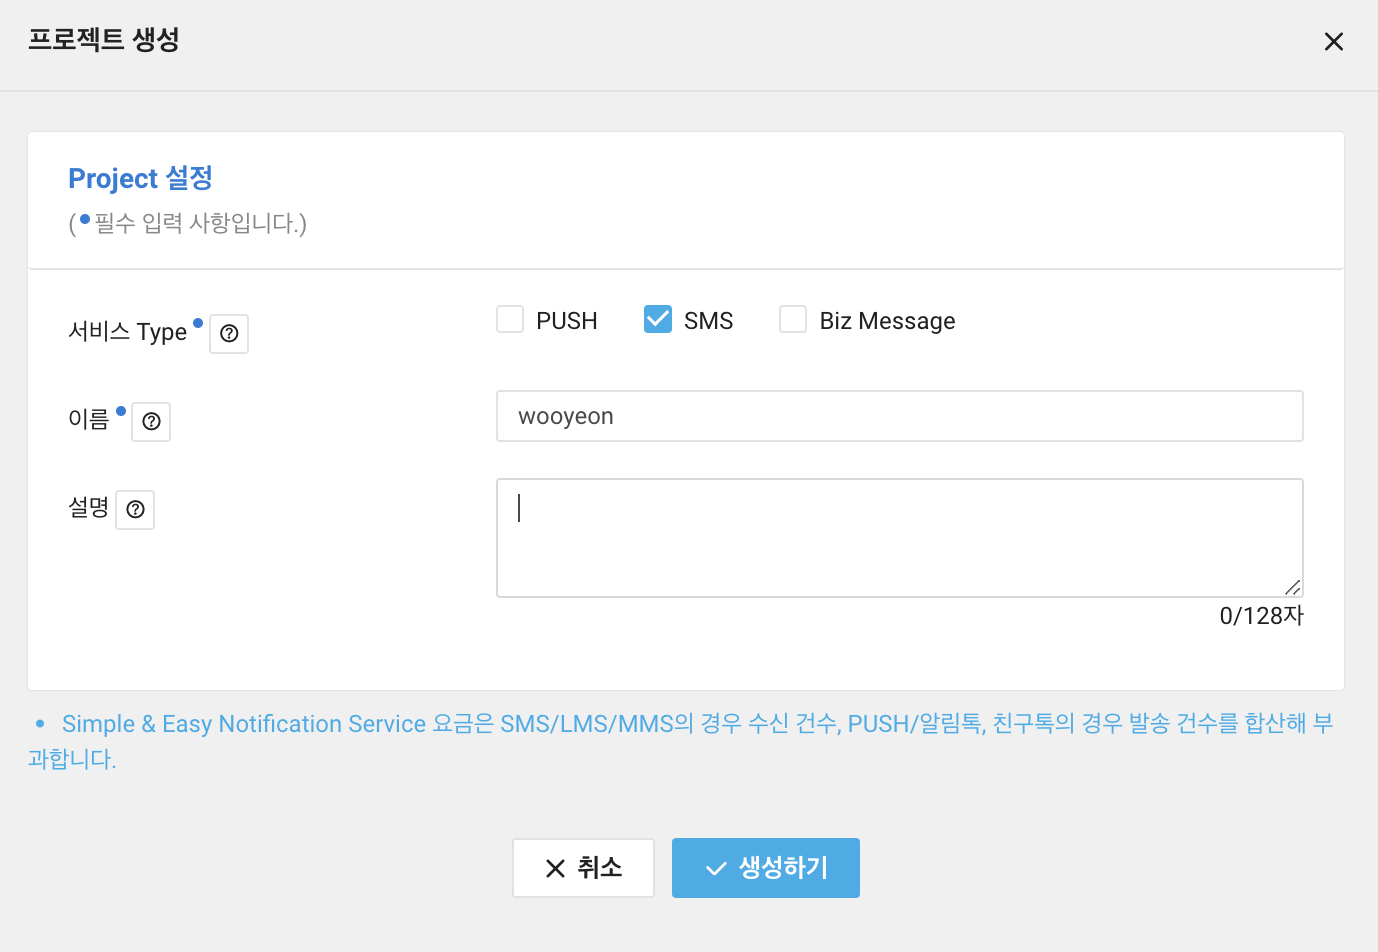

생성되면 위와 같은 모습이다.
4. 발신번호 등록
왼쪽 탭의 Simple & Easy Notification Service - SMS - Calling Number로 이동


등록 완료된 모습은 위와 같다.
난 약 2달 전에 진행해서 인증만 하면 되었던 걸로 기억하는데, 지금 다시 보니 절차가 꽤나 복잡한 것 같기도 하다

5. 네이버 SMS API를 이용하기 위한 API KEY 생성 및 조회
네이버 클라우드 플랫폼 메인 페이지 - 가장 오른쪽 탭 클릭 - 마이페이지 - 인증키 관리로 이동

이동하면 아래와 같은 페이지가 나오는데, 신규 API KEY 생성을 클릭한다.

우리는 API 인증키를 Spring boot의 설정파일(properties, yml 등)에 기입함으로써 네이버 SMS API를 사용할 수 있다.
Access Key와 Secret Key는 절대 노출되어선 안된다!!!!!
git에 올릴 때도 api key만 모아둔 설정 파일을 만들어서 관리해야 한다. 그렇지 않으면 내 git을 타고 들어 온 타인에게 노출되어 악용될 우려가 다분하다!!!
아래 내용을 쭉 따라오면 따로 파일을 분리해서 넣는 방법까지 적어뒀다. 만약 더 자세한 설명과 방법이 필요하다면...
2023.09.10 - [Git] - [Git] git에 올렸던 파일 cache, history 삭제하기 (feat. properties 파일에서 민감 정보 분리하기)
[Git] git에 올렸던 파일 cache, history 삭제하기 (feat. properties 파일에서 민감 정보 분리하기)
최근 외부 api(구글 메일, 네이버 SMS API 등)를 사용하다 보니 properties 파일에 해당 api에 필요한 민감정보가 들어가 있어서 민감정보를 gitignore에 추가해야겠다고 생각은 하고 있었는데, 이번에 GCS
easyoungcode.tistory.com
만약 설정 파일을 분리한 상태로 git action을 돌릴 생각이라면...
2023.09.11 - [Git] - [Git] git secret 폴더에 파일 추가하기
[Git] git secret 폴더에 파일 추가하기
민감정보가 든 파일을 .gitignore에 등록해 두면 git엔 올라가지 않는다. 그럼 git action에서 빌드될 때 오류가 뜬다. 이유는 해당 파일이 깃에 없기 때문! 그렇다고 .gitignore에 등록해 둔 파일을 해제
easyoungcode.tistory.com
Spring Boot에 연결하기
스프링부트에 연결하기 전, 휴대폰 인증은 다음과 같은 절차로 진행된다.
1. 프론트엔드에게서 휴대폰 인증 요청이 들어온다.
2. 만료 시간이 지난 인증코드를 가진 데이터는 모두 삭제한다.
3. 프론트엔드에서 보내 준 요청body(RequestBody)에서 휴대폰 인증을 진행할 사용자의 휴대폰 번호를 받아온다. (PhoneInfoDto로 받아 온다, 내부엔 사용자의 휴대폰 번호를 받는 phone과 휴대폰에서 sms에 있는 인증코드를 바로 불러오기 위한 signature이 있으나 signature의 경우 생략 가능하다)
4. 해당 휴대폰 번호가 이미 존재하는 번호인지 중복확인한다(각자의 로직에 따라 생략 가능)
4-1. 만약 존재하는 번호라면 프론트엔드에게 중복됐다고 반환해준다(statusName을 duplicated로 반환)
4-2. 해당 번호가 중복된 번호가 아니라면 아래 절차를 진행한다.
5. 6자리 난수로 구성된 인증코드를 생성한다(createSmsKey)
6. 네이버 SMS API 사용을 위한 헤더와 dto를 구성한 뒤(SMSDto, SMSAuthRequestDto), 내용엔 인증코드를 넣어서 전송한다.
7. 전송 후 네이버에서 응답받은 responseBody를 프론트엔드에게 반환한다.
--------아래부터는 생략 가능하거나 각자의 프로젝트에 따라 변경 가능한 로직입니다--------
7. PhoneAuth 테이블에 해당 사용자의 휴대폰 번호, 인증코드, 인증코드 만료시간을 삽입한다. (생략 가능)
8. 휴대폰 인증 요청이 들어오면, 해당 phoneAuth 테이블에서 해당 사용자의 휴대폰 번호와 인증코드가 일치하는 지 확인한다.
8-1. 만약 일치한다면 해당 데이터의 certification 컬럼을 true로 변경 후, 프론트엔드에게 success를 반환한다.
8-2. 만약 일치하지 않는다면, 프론트엔드에게 fail을 반환한다.
1. build.gradle에 HttpClient 의존성 추가
// org.apache.httpcomponents.client5/httpclient5
implementation group: 'org.apache.httpcomponents.client5', name: 'httpclient5', version: '5.2.1'

// org.apache.httpcomponents/httpclient
implementation group: 'org.apache.httpcomponents', name: 'httpclient', version: '4.5.13'
2. 설정 파일 나누기
application-sercrekey.properties
naver-cloud-sms.accessKey=위에서 발급받은 accesskey
naver-cloud-sms.secretKey=위에서 발급받은 secretkey
naver-cloud-sms.serviceId=해당 service id (프로젝트에서 확인 가능)
naver-cloud-sms.senderPhone=전화번호
그리고 위 파일을 기존 설정 파일에 include 해줘 api key를 불러 올 수 있게 만든다.
application.properties
...
spring.profiles.include=secretkey
...
3. Request Body와 ResponseBody에 담길 DTO 구성
먼저 네이버 클라우드 플랫폼에서 제공하는 SMS API 가이드에 따른 요청과 응답 Body는 아래와 같다.
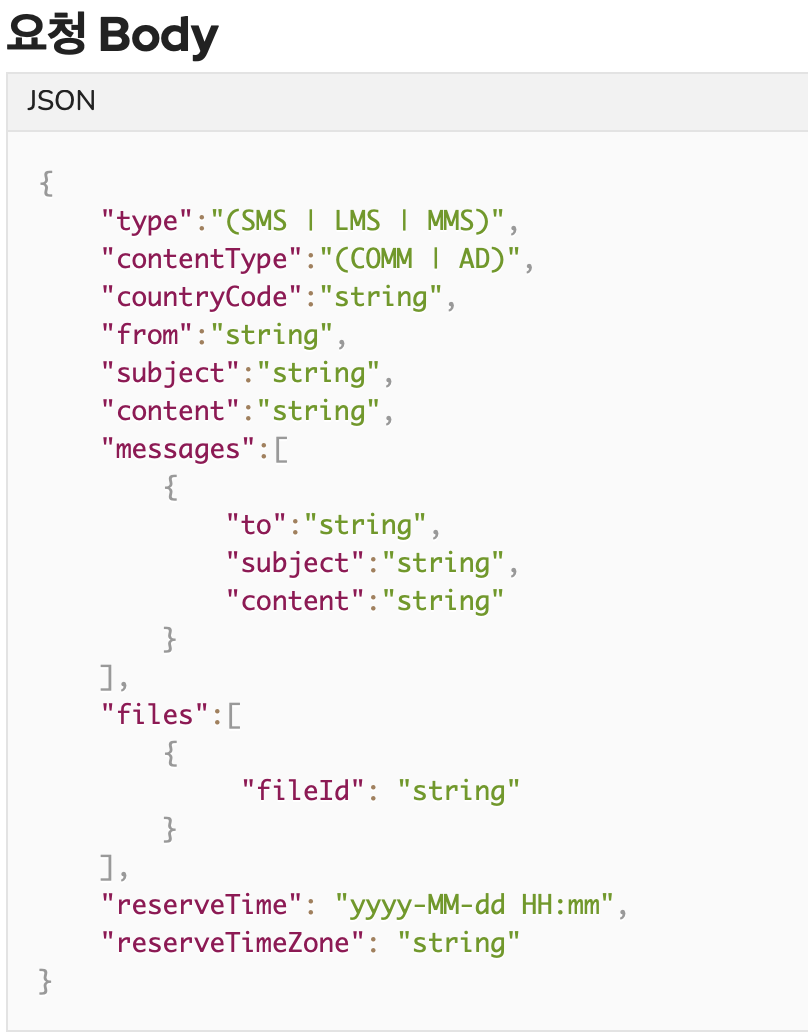
위 양식에 따라서 DTO를 구성해보자.
SmsAuthRequestDto.java // 요청 Body의 전반적인 부분
@AllArgsConstructor
@Getter
@Builder
public class SmsAuthRequestDto {
    private String type;
    private String contentType;
    private String countryCode;
    private String from;
    private String content;
    private List<SmsDto> messages;
}
각 항목의 자세한 설명은 아래와 같다(네이버 SMS API 가이드 참조)

SmsDto.java // 요청 Body의 message 내에 들어가는 to, content, subject가 있는 DTO이다.
@AllArgsConstructor
@NoArgsConstructor
@Getter
@Setter
public class SmsDto {
private String to;
// private String content;
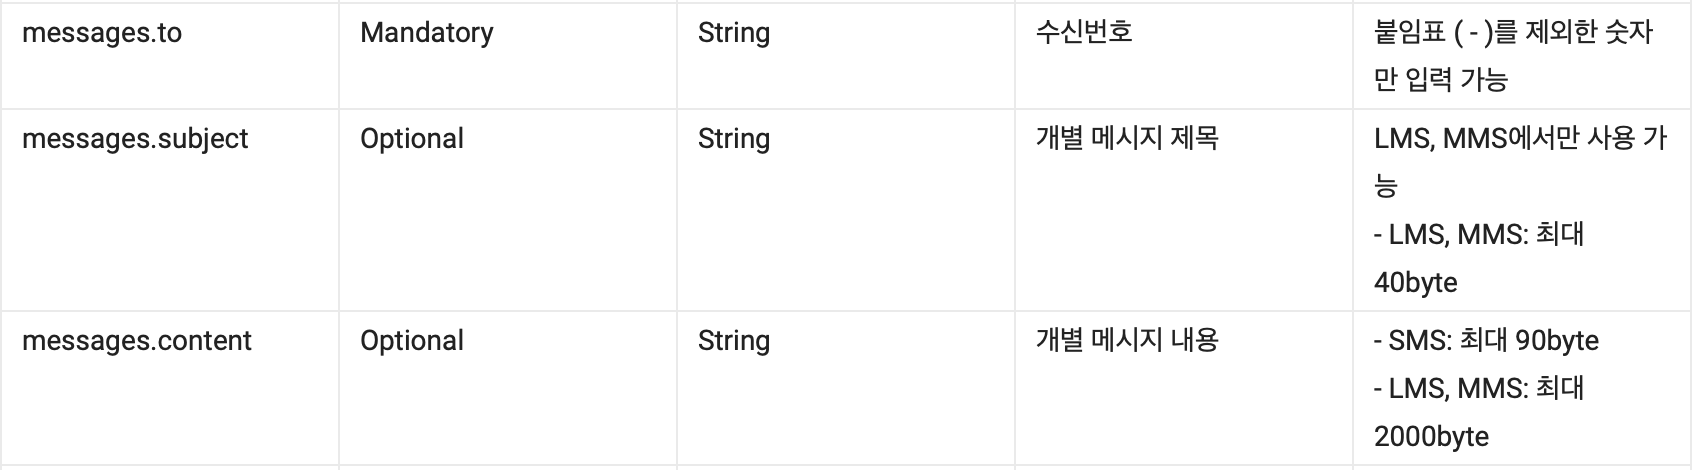
}여기서 to는 받는 사람,
content는 내용인데, 난 content 부분을 service에서 정해줬기 때문에 주석 처리 해줬다. (6자리 난수로 된 인증번호 생성 때문)
subject의 경우 LMS, MMS에서만 사용 가능하기 때문에 넣어주지 않았다.
각 항목의 자세한 설명은 아래와 같다(네이버 SMS API 가이드 참조)
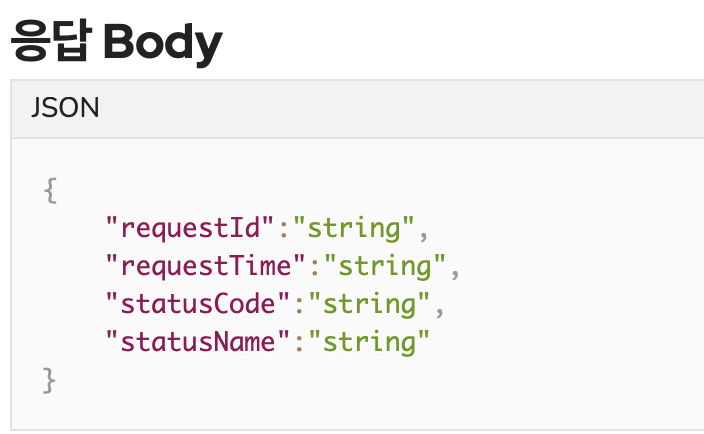
아래는 네이버 SMS API에서 메시지 전송 후, 우리 측으로 전달해주는 responseDTO이다. (위에서 서술된 응답Body와 동일)
SmsAuthResponseDto.java
@AllArgsConstructor
@NoArgsConstructor
@Getter
@Builder
public class SmsAuthResponseDto {
    private String requestId;
    private LocalDateTime requestTime;
    private String statusCode;
    private String statusName;
}
4. 휴대폰 인증 정보 테이블 (생략 가능, 저는 휴대폰 인증 확인 및 데이터 대조용으로 만들었습니다)
@Entity
@Getter
@NoArgsConstructor(access = AccessLevel.PROTECTED)
public class PhoneAuth {

    @Id
    @GeneratedValue(strategy = GenerationType.AUTO)
    private Long id;

    @Column(length = 11, nullable = false)
    private String phone; // 휴대폰 번호

    @Column(length = 6, nullable = false)
    private String verifyCode; // 인증코드 6자리(난수)

    @Column(nullable = false)
    private LocalDateTime expireDate; // 인증코드 만료일

    private boolean certification; // 인증여부

    @Builder
    public PhoneAuth(String phone, String verifyCode, LocalDateTime expireDate, boolean certification) {
        this.phone = phone;
        this.verifyCode = verifyCode;
        this.expireDate = expireDate;
        this.certification = certification;
    }

    // 휴대폰 인증 완료
    public void phoneVerifiedSuccess() {
        this.certification = true;
    }

}
사용자의 휴대폰 phone,
6자리 난수로 된 인증코드 verifyCode,
인증코드 만료일 expireDate,
인증 여부 certification로 구성해주었다.
5. 6자리 난수로 구성된 인증코드 생성
SmsAuthService.java
...
// 인증코드 생성
    public String createSmsKey() {
        int key = ThreadLocalRandom.current().nextInt(999999);
        return Integer.toString(key);
    }
...
6. Service 구성
(아래는 예시코드입니다)
SmsAuthService.java
@PropertySource("classpath:application-apikey.properties")
@Slf4j
@Service
public class SmsAuthService {

    private final PhoneAuthRepository phoneAuthRepository;

	// api key는 감춘 이유가 있는 만큼 환경변수로 불러와 선언해주기!!
    @Value("${naver-cloud-sms.accessKey}")
    private String accessKey;

    @Value("${naver-cloud-sms.secretKey}")
    private String secretKey;

    @Value("${naver-cloud-sms.serviceId}")
    private String serviceId;

    @Value("${naver-cloud-sms.senderPhone}")
    private String fromPhone;

    // smsConfirmNum 만료 시간 (3분)
    private static final long EXPIRATION_TIME = 3 * 60 * 1000;

    public SmsAuthService(PhoneAuthRepository phoneAuthRepository) {
        this.phoneAuthRepository = phoneAuthRepository;
    }

    public SmsAuthResponseDto sendSms(PhoneInfoRequestDto phoneInfoRequestDto) {
        // 인증 코드 만료 시간이 지난 데이터 삭제
        deleteExpiredStatusIfExpired();

        // smsDto 설정
        SmsDto smsDto = new SmsDto();
        smsDto.setTo(phoneInfoRequestDto.getTo());

        String appSignature = phoneInfoRequestDto.getSignature();

        // 휴대폰 번호가 중복일 경우 프론트엔드에게 statusName으로 중복됨을 알려주기(statusCode가 500이 나 버리면 안되기 때문에)
        if (validateDuplicated(smsDto.getTo())) {
            SmsAuthResponseDto smsAuthResponseDto = SmsAuthResponseDto.builder()
                    .requestId("duplication")
                    .statusName("duplicated")
                    .statusCode("202")
                    .requestTime(LocalDateTime.now())
                    .build();
            return smsAuthResponseDto;
        }
        SmsAuthResponseDto smsAuthResponseDto;
        try {
            smsAuthResponseDto = createMessage(smsDto, appSignature);
        } catch (JsonProcessingException | UnsupportedEncodingException | NoSuchAlgorithmException |
                 InvalidKeyException | URISyntaxException e) {
            throw new RuntimeException(e);
        }
        return smsAuthResponseDto;
    }

    // 네이버 SMS API를 통한 message 생성 및 전송, PhoneAuth에 데이터 저장
    public SmsAuthResponseDto createMessage(SmsDto smsDto, String appSignature) throws JsonProcessingException, RestClientException, URISyntaxException, InvalidKeyException, NoSuchAlgorithmException, UnsupportedEncodingException {
        //휴대폰 인증 번호 생성
        String smsConfirmNum = createSmsKey();

        Long time = System.currentTimeMillis();

        // 네이버 sms api 헤더 생성
        HttpHeaders headers = new HttpHeaders();
        headers.setContentType(MediaType.APPLICATION_JSON);
        headers.set("x-ncp-apigw-timestamp", time.toString());
        headers.set("x-ncp-iam-access-key", accessKey);
        headers.set("x-ncp-apigw-signature-v2", makeSignature(time));

        List<SmsDto> smsDtoList = new ArrayList<>();
        smsDtoList.add(smsDto);

        // 네이버 sms api 이용
        SmsAuthRequestDto request = SmsAuthRequestDto.builder()
                .type("SMS")
                .contentType("COMM")
                .countryCode("82")
                .from(fromPhone)
                .content("[우연] 인증번호를 입력해주세요\n" + smsConfirmNum + "\n\n" + appSignature)
                .messages(smsDtoList)
                .build();

        ObjectMapper objectMapper = new ObjectMapper();
        String body = objectMapper.writeValueAsString(request);
        HttpEntity<String> httpBody = new HttpEntity<>(body, headers);

        RestTemplate restTemplate = new RestTemplate();
        restTemplate.setRequestFactory(new HttpComponentsClientHttpRequestFactory());
        SmsAuthResponseDto response = restTemplate.postForObject(new URI("https://sens.apigw.ntruss.com/sms/v2/services/" + this.serviceId + "/messages"), httpBody, SmsAuthResponseDto.class);

        // phoneAuth에 저장
        LocalDateTime expireDate = LocalDateTime.now().plusSeconds(EXPIRATION_TIME / 1000);
        PhoneAuth phoneAuth = PhoneAuth.builder()
                .phone(smsDto.getTo())
                .verifyCode(smsConfirmNum)
                .expireDate(expireDate)
                .build();
        phoneAuthRepository.save(phoneAuth);

        return response;
    }

    // 휴대폰 번호 인증 처리
    @Transactional
    public PhoneAuthResponseDto verifyPhone(PhoneAuthRequestDto phoneAuthRequestDto) {
        // 휴대폰 번호와 인증 코드가 일치하는 지 확인
        PhoneAuth phoneAuth = phoneAuthRepository.findByPhoneAndVerifyCode(phoneAuthRequestDto.getPhone(), phoneAuthRequestDto.getVerifyCode());

        PhoneAuthResponseDto phoneAuthResponseDto;
        // 만약 일치 한다면 PhoneAuth(휴대폰 인증여부)를 success로 반환
        if (phoneAuth != null) {
            phoneAuthResponseDto = PhoneAuthResponseDto.builder()
                    .phoneAuth("success")
                    .registerProc("none") // 나중에 프로필, 이용약관 동의까지 구현 후 변경 요망
                    .build();
            phoneAuth.phoneVerifiedSuccess(); // 해당 데이터의 certification(인증완료) 값을 true로 설정
        } else { // 일치하지 않으면 fail 값을 반환
            phoneAuthResponseDto = PhoneAuthResponseDto.builder()
                    .phoneAuth("fail")
                    .registerProc(null) // registerProc은 null로 설정
                    .build();
        }
        return phoneAuthResponseDto;
    }

    // NAVER SMS API signature 생성
    public String makeSignature(Long time) throws NoSuchAlgorithmException, UnsupportedEncodingException, InvalidKeyException {
        String space = " ";
        String newLine = "\n";
        String method = "POST";
        String url = "/sms/v2/services/" + this.serviceId + "/messages";
        String timestamp = time.toString();
        String accessKey = this.accessKey;
        String secretKey = this.secretKey;

        String message = new StringBuilder()
                .append(method)
                .append(space)
                .append(url)
                .append(newLine)
                .append(timestamp)
                .append(newLine)
                .append(accessKey)
                .toString();

        SecretKeySpec signingKey = new SecretKeySpec(secretKey.getBytes("UTF-8"), "HmacSHA256");
        Mac mac = Mac.getInstance("HmacSHA256");
        mac.init(signingKey);

        byte[] rawHmac = mac.doFinal(message.getBytes("UTF-8"));
        String encodeBase64String = Base64.encodeBase64String(rawHmac);

        return encodeBase64String;
    }

    // 인증코드 생성
    public String createSmsKey() {
        int key = ThreadLocalRandom.current().nextInt(999999);
        return Integer.toString(key);
    }

    // 휴대폰 번호 중복 확인 로직 구현
    private boolean validateDuplicated(String phone) {
        // 중복된 휴대폰 번호가 이미 PhoneAuth 테이블에 존재한다면 예외 처리
        if (phoneAuthRepository.existsByPhone(phone)) {
            return true;
        }
        return false;
    }

    // PhoneAuth에 있는 expiredDate가 지난 데이터 삭제
    @Transactional
    public void deleteExpiredStatusIfExpired() {
        LocalDateTime currentDateTime = LocalDateTime.now();
        phoneAuthRepository.deleteExpiredRecords(currentDateTime);
    }

}
7. RestfulAPI를 통해 소통하기 (Controller 구성)
UserController.java
// 사용자의 휴대폰으로 인증번호 전송
    @PostMapping(value = "/auth/phone", produces = "application/json;charset=UTF-8")
    public ResponseEntity<SmsAuthResponseDto> sendSmsVerify(@RequestBody PhoneInfoRequestDto phoneInfoRequestDto) throws UnsupportedEncodingException, URISyntaxException, NoSuchAlgorithmException, InvalidKeyException, JsonProcessingException {
        SmsAuthResponseDto responseDto = smsAuthService.sendSms(phoneInfoRequestDto);
        return ResponseEntity.ok().body(responseDto);
    }
/auth/phone해당 API로 프론트엔드에서 json 형태로 phone 값을 넘겨주면, 백엔드에서 @RequestBody 어노테이션을 통해 PhoneInfoRequestDto를 통해서 정보를 받는다. (@RequestBody 어노테이션은 클라이언트가 전송하는 JSON 형태의 HTTP Body 내용을 MessageConverter를 통해 Java Object로 변환시켜주는 역할을 한다)
SmsAuthService에서 sendSms 메서드를 실행하여 실행 결과 값에 따라 SmsAuthResponseDto를 구성 후, 프론트엔드로 반환해준다.
(생략 가능) 휴대폰 인증 번호 확인 절차
1. Request Body에 담길 DTO 구성 (아래는 예시코드입니다)
PhoneAuthRequestDto.java
@AllArgsConstructor
@Getter
@Builder
public class PhoneAuthRequestDto {
    private String phone; // 휴대폰 번호
    private String verifyCode; // 인증코드
}
응답 Body는 각자의 프로젝트에 맞게 구성해주시면 됩니다.
2. RestfulAPI를 통해 소통
UserController.java
    // 인증번호 확인
    @PostMapping(value = "/auth/phone/verify", produces = "application/json;charset=UTF-8")
    public ResponseEntity<PhoneAuthResponseDto> verifyPhone(@RequestBody PhoneAuthRequestDto phoneAuthRequestDto) throws UnsupportedEncodingException, URISyntaxException, NoSuchAlgorithmException, InvalidKeyException, JsonProcessingException {
        PhoneAuthResponseDto responseDto = smsAuthService.verifyPhone(phoneAuthRequestDto);
        return ResponseEntity.ok().body(responseDto);
    }
/auth/phone/verify해당 API로 프론트엔드에서 json 형태로 phone과 verifyCode를 보내주면 백엔드에서 @RequestBody 어노테이션을 통해 PhoneAuthRequestDto를 통해서 받는다.
SmsAuthService에서 verifyPhone 메서드를 실행하여 실행 결과 값에 따라 PhoneAuthResponseDto를 구성 후, 프론트엔드로 반환해준다.
아래는 네이버 클라우드 플랫폼에서 제공하는 SMS API 공식 가이드 입니다.
https://api.ncloud-docs.com/docs/ai-application-service-sens-smsv2#메시지발송
SMS API
api.ncloud-docs.com
'Spring' 카테고리의 다른 글
| [Spring] 스프링의 인터셉터(Interceptor) (2) | 2024.01.21 |
|---|---|
| [Spring] SpringBoot 3.x 버전에서 JSTL 사용 방법 (0) | 2023.12.18 |
| [Spring] SMTP로 html template(image 포함) 포함한 인증 메일 보내기(JAVA)(이메일 API) (0) | 2023.11.06 |
| [Spring] GCS(Google Cloud Storage)를 이용하여 MultipartFile(이미지 파일) 업로드 및 포스트맨으로 테스트 해보기(MultipartFile&JSON) (feat. Spring, flutter) (0) | 2023.09.18 |
| springboot(Maven 기반)에서 mailAPI 사용하기(클래스 이용) (0) | 2023.05.31 |


